

Upside MCP Setup
Connect your favorite AI tools to Upside's data and insights using the Model Context Protocol (MCP).
What is Upside?
Upside is an analytics platform designed to help GTM leaders get an accurate understanding of what’s happening in accounts and deals. We sync data from GTM systems such as CRM, marketing automation, and call recording platforms and unify them into a dataset that can be queried to understand the performance of channels, programs, webpages, etc.
What is the Upside MCP?
The Upside MCP enables AI assistants direct access to the data in your existing Upside instance. This can be used to query data, prepare reports, or build custom mini-apps/dashboards via natural language prompting.
What is required to set it up?
In some cases, depending on the platform, an administrator will need to perform the initial set up based on the instructions below. Afterwards, each Upside user can follow the steps in Upside MCP Usage Documentation to leverage the MCP.
General Setup Instructions
- MCP Server URL:
https://app.upside.tech/mcp - Authentication method:
OAuth
In some MCP clients (Cursor, Claude Desktop), you can now only set up each MCP URL once. If that happens, set up the second instance with any random URL parameter at the end.
Setup Instructions by Platform
ChatGPT
Requires Admin-level access to ChatGPT Pro, Team, Enterprise, or Edu.
- Open **ChatGPT.com** → click your profile icon in the bottom left → Settings
- Click the Apps tab
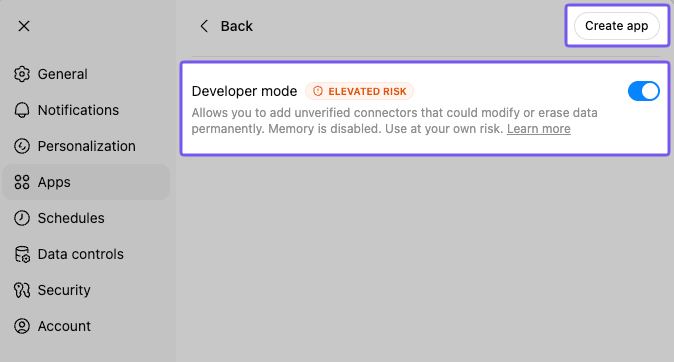
- Scroll to the bottom of the app list and find "Advanced settings"
- Make sure Developer mode is enabled, then click "Create app"
- If you do not see an option for Developer Mode, you do not have sufficient privileges. Reach out to your administrator for help.
-
Fill in the app details:
-
Name:
Upside -
Description:
Query Upside for Marketing Insights and Metrics -
MCP Server URL:
https://app.upside.tech/mcp -
Authentication: OAuth (no need to add Client ID or Client Secret)
-
Check the box "I understand and want to continue"
-
Click Create
-
You will be redirected to log in to Upside (you do not need to do this at this stage and you can simply click back on your browser window)
Is Upside safe?
Since OpenAI hasn't yet reviewed this MCP configuration, you will encounter several warnings. Rest assured, Upside has been approved for use at your organization and has already passed relevant compliance/security measures. If you have any questions about this, please ask your Upside admin or the team at Upside. -
-
In Apps, you'll have a section for Drafts which will list the newly created Upside app → Click Upside
-
Click the 3 dots in the top right, and select Publish
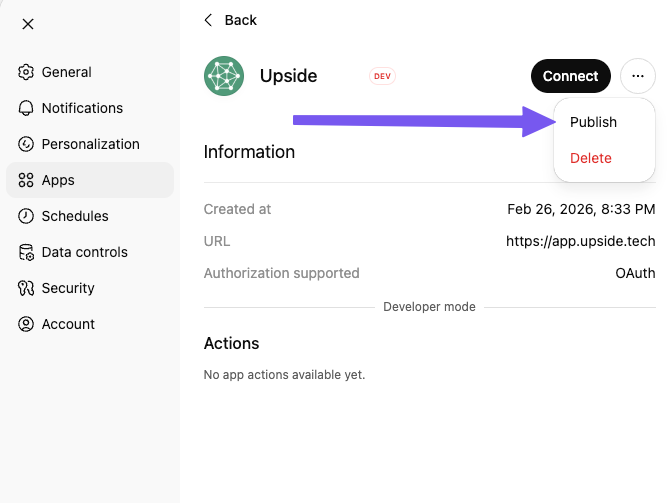
- Click Publish to approve this app for your team
- Note: you will see additional warnings about potential risks such as unauthorized data access and malicious apps.
- Check the acknowledgment boxes, then click Publish.
- Assign the app to the appropriate users or groups:
- Navigate to Workspace Settings → Settings & Permissions → Custom Roles
- Select or create a role, and enable access to the Upside app for that role
- Go to the Groups tab and assign the role to the relevant group(s), or assign it directly to individual users
- Users will inherit access to the Upside app through their assigned role
- You're done! Upside is now an app that can be used by the users and groups you assigned it to.
Claude (claude.ai or Claude Desktop)
This covers Claude Chat, Claude Cowork, and Claude Code in the Desktop app. For Claude Code in CLI instructions, see the separate section below.
Requires Admin or Owner-level access to Claude.
- Open Claude at https://claude.ai or open Claude Desktop
- Click Customize in the right sidebar.
- In Claude Desktop, you may need to expand the sidebar first
- Click Connectors
- Click the + button and select Add Custom Connector
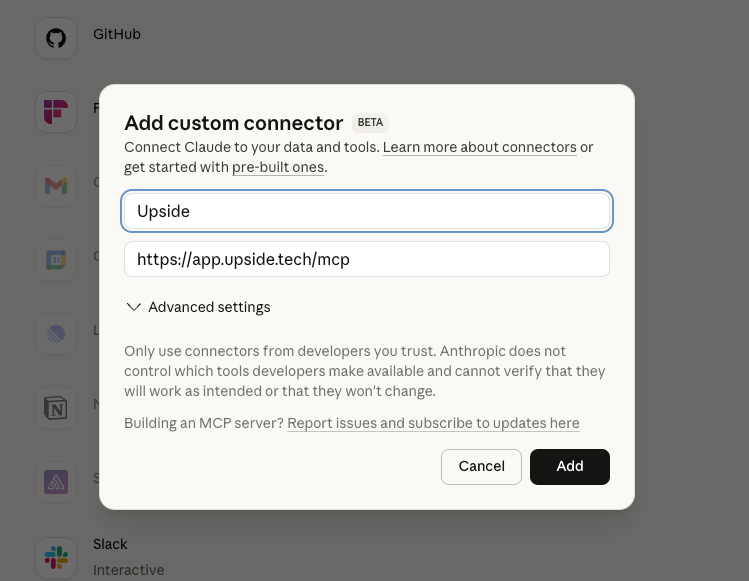
- Enter Upside as the name and set the Remote MCP server URL to:
https://app.upside.tech/mcp- Click Add to finalize setup.
- Note: this will also enable the connector in Claude Desktop.
Claude Code
- Run this command in your terminal:
claude mcp add upside --transport http https://app.upside.tech/mcp- Run
claudein your terminal to launch Claude Code - Type
/mcpto view MCP servers and authenticate Upside
Google Gemini
As of early 2026, Gemini Chat (gemini.google.com) does not yet support MCP connectors. If available, you may try Gemini CLI as an alternative).
Gemini CLI
- Run this command in your terminal:
gemini mcp add --transport http upside https://app.upside.tech/mcp- Run
geminiin your terminal to launch Gemini CLI - Type
/mcpto view MCP servers and authenticate Upside
Cursor
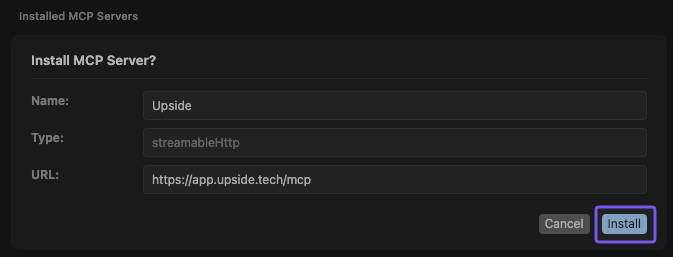
- Click this link to configure Cursor in one click
- Click Install in Cursor when prompted.
-
In the MCP settings, click Connect and log in with your Upside credentials

-
Alternatively, if you'd like to set it up manually, you can add this to your
.cursor/mcp.json:{ "mcpServers": { "upside": { "url": "https://app.upside.tech/mcp" } } }
-
-
Ensure the MCP toggle is enabled.
VS Code
- Open VS Code and press
Cmd+Shift+P(macOS) orCtrl+Shift+P(Windows/Linux) to open the Command Palette - Type and select
MCP: Add Server - Select HTTP as the server type
- Enter the MCP server URL when prompted:
https://app.upside.tech/mcp-
Enter
upsideas the server name. This adds the following to your.vscode/mcp.json:{ "servers": { "upside": { "url": "https://app.upside.tech/mcp", "type": "http" } } } -
VS Code will trigger an OAuth flow — log in with your Upside credentials in the browser window that opens
-
Once authenticated, Upside tools will be available in VS Code's Copilot Chat
Craft Agents
- Open Craft Agents → Sources / MCPs
- Click Add Source
- Paste the URL:
https://app.upside.tech/mcp- Craft will detect the OAuth requirement and ask you to log in one time to complete authentication
- Upside tools will now be available across all your sessions.
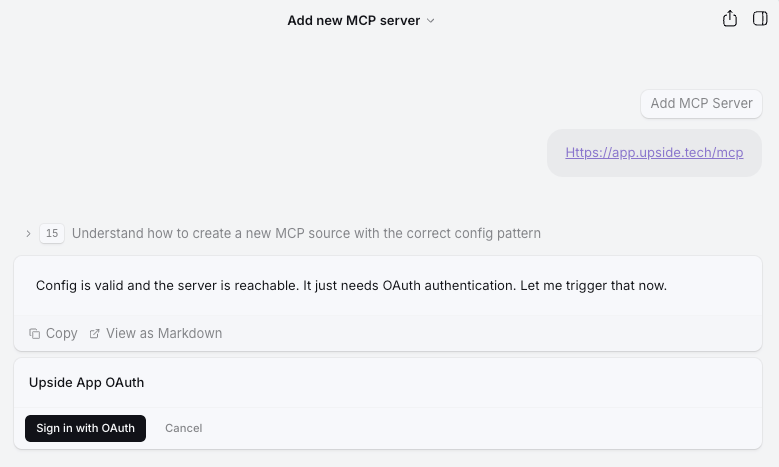
Codex
Requires Codex CLI or Codex Desktop with an active OpenAI plan.
Codex CLI
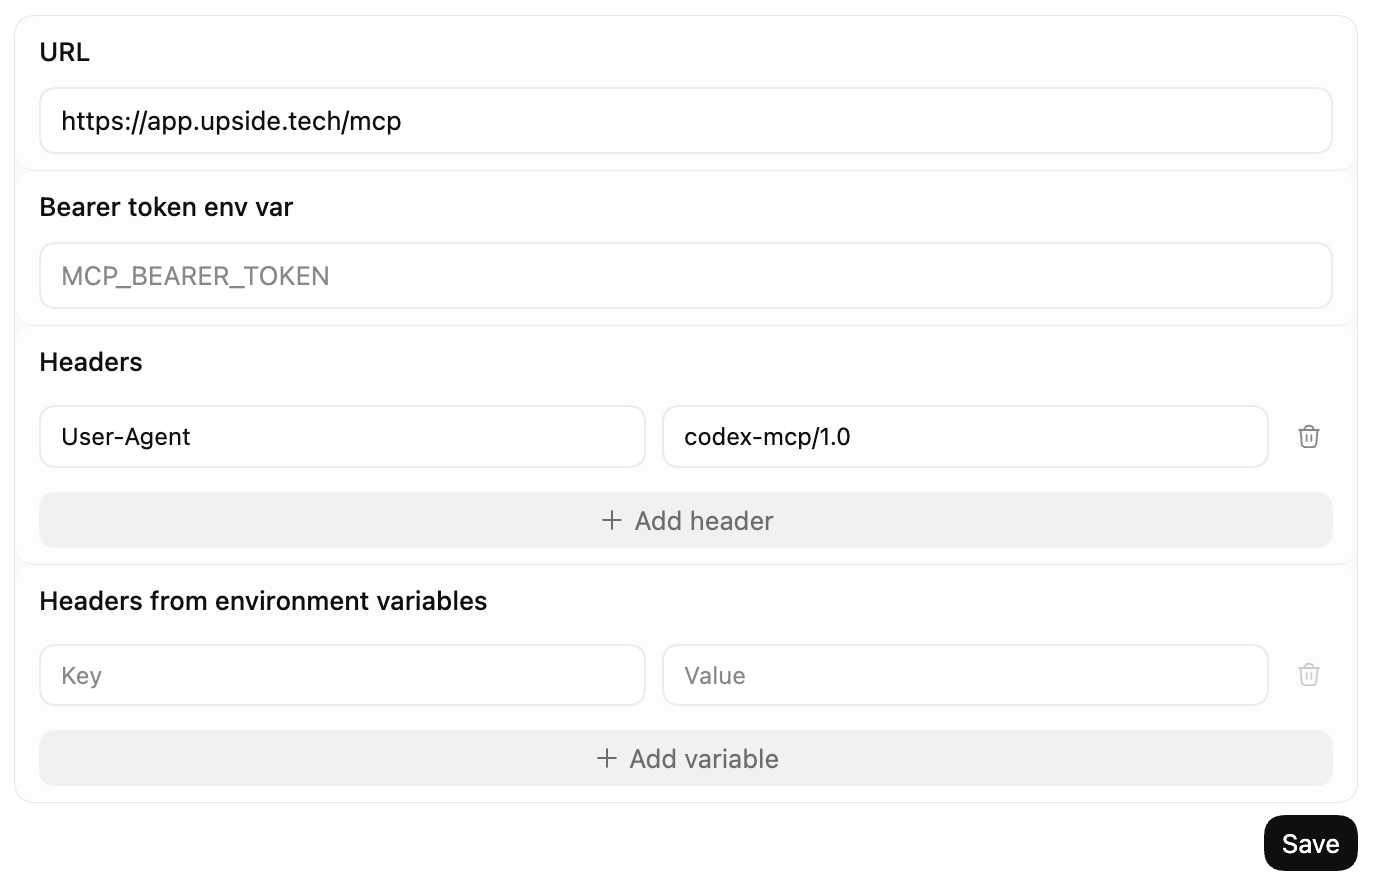
- Run the following command to add the Upside MCP server and configure the required User-Agent header:
macOS
codex mcp add upside --url https://app.upside.tech/mcp && printf '\n[mcp_servers.upside.http_headers]\nUser-Agent = "codex-mcp/1.0"\n' >> ~/.codex/config.tomlWindows
codex mcp add upside --url https://app.upside.tech/mcp; Add-Content "$HOME\.codex\config.toml" "`n[mcp_servers.upside.http_headers]`nUser-Agent = `"codex-mcp/1.0`"`n"The User-Agent header is required. Without it, the connection will be blocked with a 403 error — this is currently a known Codex bug.
- Authenticate by running:
codex mcp login upside- Complete the OAuth flow in the browser window that opens, then return to your terminal.
- Start a new chat thread to begin using Upside. Note that new MCP connections are not available in existing threads.
Codex Desktop
You can also add the MCP server in Codex Desktop via the settings menu. Enter https://app.upside.tech/mcp as the server URL. OAuth is used by default, even though the UI does not explicitly show it as an option.
After adding the MCP server in Desktop, you must fully restart Codex for the changes to take effect. You will also need to start a new chat thread to use Upside.
Codex CLI and Desktop share the same configuration (~/.codex/config.toml), so setting it up in one works for both.
Dust
- Follow steps in documentation: https://docs.dust.tt/docs/remote-mcp-server
- Use
https://app.upside.tech/mcpas the remote MCP server when prompted.
Notion
- Follow steps in documentation: https://www.notion.com/help/mcp-connections-for-custom-agents
- Use
https://app.upside.tech/mcpas the remote MCP server when prompted.
Glean
- Follow steps in documentation: https://docs.glean.com/administration/actions/connect-remote-mcp-servers-to-glean
- Use
https://app.upside.tech/mcpas the remote MCP server when prompted.
Lovable
- Follow steps in documentation: https://docs.lovable.dev/integrations/mcp-servers#how-to-connect-a-custom-mcp-server
- Use
https://app.upside.tech/mcpas the remote MCP server when prompted.
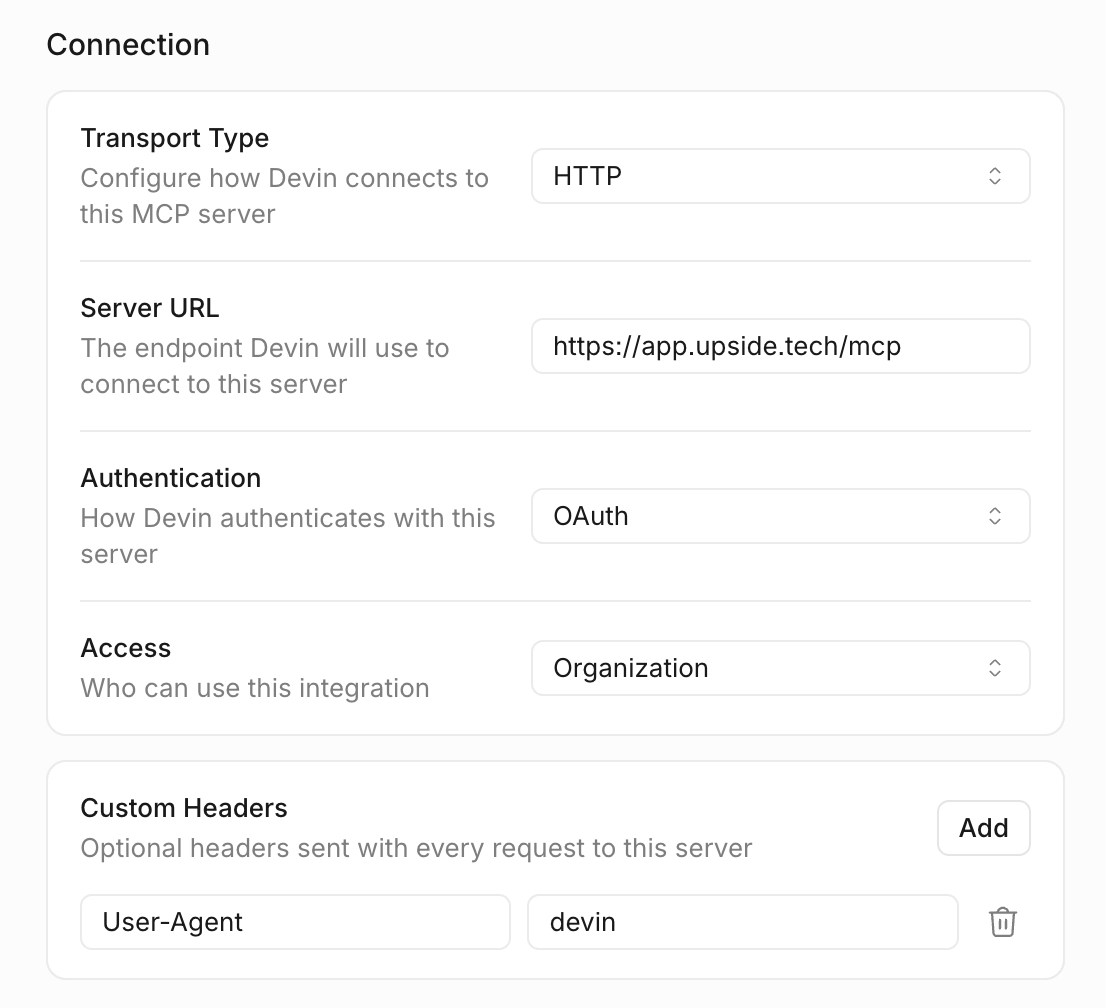
Devin
- Follow steps in documentation: https://docs.devin.ai/work-with-devin/mcp#setting-up-a-custom-mcp-server
- Use the following configuration
-
Server name: Upside
-
Icon: https://upside.tech/logo.svg
-
Short Description: Access the Upside MCP
-
Connection:Transport Type: HTTP
-
Server URL: https://app.upside.tech/mcp
-
Authentication: OAuth
-
-
Access: Organization
-
Add custom header: "User-Agent" set to "devin"
- Click Install and Enable.
- Click Complete OAuth to authenticate
Need Help?
If you run into any issues or have questions, reach out to the Upside team in Slack.